· Rehman Ahmad · 8 min read
How to Improve Handwriting: Free Printable Worksheets and a 10-Minute Daily Plan
A head teacher's honest method for fixing messy handwriting: the four basics most children were never taught, letter families instead of A to Z, a ten-minute daily plan, and a free printable practice pack.

How to Improve Handwriting: Free Printable Worksheets and a 10-Minute Daily Plan
Every term I mark exercise books where the answers are right and the marks are still lost. Not because the child does not know the work — because the examiner cannot read it comfortably. Letters float above the line, words crowd together, and by the third page the writing has collapsed into a tired scrawl.
Parents ask me the same question in different words: how to improve handwriting when it has already become a habit? The honest answer from twenty years of classrooms is that handwriting rarely improves by writing more. It improves by fixing four small basics, practising the right letters together, and doing a little every day.
That is what this page gives you: the method I use in my own school, a daily plan that takes ten minutes, and a free pack of improve handwriting worksheets you can print today.
Why handwriting slips (and why it costs marks)
Children are usually taught letters once, quickly, in the early classes — and then never taught again. After that, speed takes over. The child writes faster to keep up with dictation, and whatever shape the letters had at age six is the shape they keep at age twelve.
Three things quietly go wrong:
- The grip hardens. A fist grip or a thumb wrapped over the pencil makes the hand ache, and an aching hand writes badly.
- Letters lose their sizes. Small letters grow tall, tall letters shrink, and words stop sitting on the line.
- Nobody checks the basics again. We correct spellings and sums, but rarely how a letter is formed.
The good news: handwriting is a motor skill, not a talent. Motor skills respond to short, regular, correct practice — which is exactly what the plan below is built on.
First, the four basics
Before any worksheet, fix these. In my experience they account for most “bad handwriting” on their own.
1. Grip
Thumb and first finger pinch the pencil; the middle finger rests underneath as a shelf. The grip should be relaxed enough that you can wiggle the pencil slightly. If the child’s knuckles turn white, the grip is doing damage.
2. Paper position
The paper should sit slightly tilted — top corner pointing away from the writing hand — and be held steady by the free hand. A page that slides around produces letters that slide around too.
3. Posture
Feet flat on the floor, back straight, forearms resting on the desk. Children who perch, lean or lie across the desk cannot control a pencil for long.
4. Letter height on the line
This is the one nobody teaches and everybody needs. On a four-line guide: small letters live between the baseline and the middle line; tall letters reach the top line; letters like g, j, p, q and y drop below the baseline. When every letter knows its height, writing tidies itself almost overnight. These are my most-used neat handwriting tips, and they cost nothing.
Teach letters in families, not A to Z
Alphabet order is a reading order, not a writing order. Letters are easier to master grouped by the shape the hand makes:
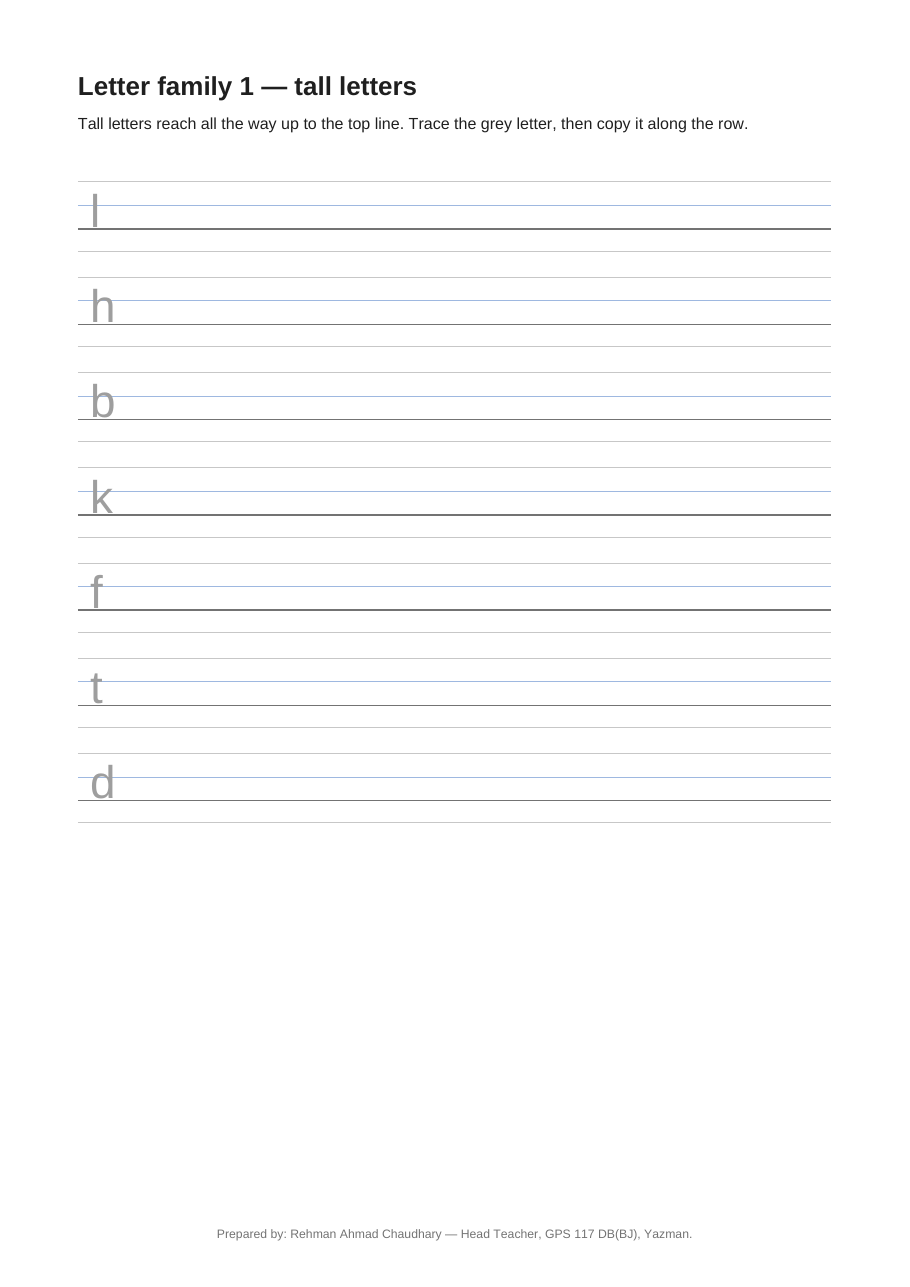
- Tall letters — l, h, b, k, f, t, d: one upward stroke, reaching the top line.
- Small letters — a, c, e, m, n, o, r, s, u, v, w, x, z: compact letters that stay in the middle band.
- Tail letters — g, j, p, q, y: the ones that dive below the line, and the ones children most often get wrong.
- Capitals — practised separately, standing from the baseline to the top line.
A child who masters the tall family has really learned one movement seven times. That is faster — and it sticks.
The 10-minute daily plan
Ten minutes, six days a week. Short enough that no child can argue, regular enough that it works. This is the same routine behind searches for how to improve handwriting for kids that I give parents at school:
- Monday — Tall letters. One row each of l, h, b, k, f, t, d. Slow, tall, touching the top line.
- Tuesday — Small letters. a to z in the small family, all sitting in the middle band, all the same size.
- Wednesday — Tail letters and capitals. g, j, p, q, y with proper tails below the line, then one row of capitals.
- Thursday — Joining words. Short everyday words — the, and, school, teacher, book, pencil — written whole, with even spaces.
- Friday — Sentences. Two or three full sentences copied carefully. This is where spacing and rhythm come together.
- Saturday — Best writing. The child writes one sentence of their own choice, their very best, and checks it against three questions: Are my letters on the line? Are my spaces even? Is it neat?
Sunday is off. Rest is part of learning too.
The free practice pack
I made the pack below so that nobody has to draw four-line guides by hand — it is the set of handwriting practice worksheets free printable pages I use with this plan:
- Page 1 — How to use the pack: the grip, posture and line rules on one page.
- Page 2 — Tall letters: l, h, b, k, f, t, d, one guided row each — trace the grey letter, then copy it along the row.
- Page 3 — Small letters: all thirteen small letters, traced then copied on four-line guides.
- Page 4 — Tails and capitals: g, j, p, q, y dropping below the line, plus capitals A to Z.
- Page 5 — Joining words: eight everyday words to trace and copy three times each.
- Page 6 — Sentences: four practice sentences, including the pangram about the quick brown fox, each with a blank line to copy it yourself.
- Page 7 — My best writing: empty guided lines for the child’s own sentence, with a self-check box at the bottom.
Download the free handwriting practice pack (PDF)
Print single-sided, on ordinary paper, as many copies as your class needs. It is free for teachers and parents.
For parents: helping at home without tears
If you are a parent working on how to improve handwriting at home, the plan above works at the kitchen table exactly as it works in class — with three adjustments:
- Same time every day. After tea, before play — attach it to something that already happens.
- Praise the one thing that improved, not the ten that did not. “Your g has a proper tail today” teaches more than “this is still messy.”
- Stop at ten minutes. A child who dreads practice will defeat it; a child who finishes feeling successful will ask for tomorrow’s page.
And never make handwriting practice a punishment for a bad test. The pencil must stay a friend.
Common mistakes I see
- Marathon sessions. One hour on Sunday undoes nothing; ten minutes daily undoes everything.
- Copying from messy models. If the line above is untidy, the line below will be too. Use a clean model — that is what the grey tracing letters are for.
- Speed before shape. Fast writing is the result of correct shapes becoming automatic, never the starting point.
- Lined paper too early. Plain four-line guides first; ordinary single-line notebooks only once the heights are fixed in the hand.
- Comparing children. Compare this week’s page with last week’s page — same child, real progress, visible to everyone.
Frequently asked questions
Is 10 minutes a day enough?
Yes — if it is every day and the letters are formed correctly. Handwriting is muscle memory; short daily repetition builds it far better than a long weekly session. Most children show visible improvement in three to four weeks.
What age should children start?
Letter formation can start at five or six, once a child can hold a pencil comfortably. But it is never too late: I have seen ten and eleven year olds transform their writing in a single term, because older children grasp the line system at once.
Cursive or print first?
Print first, always. A child needs clear, separate, correctly sized letters before joining them. Cursive taught on top of shaky print shapes just joins the mistakes together. Once print letters sit properly on the line, joining is a small step.
My child’s handwriting is very slow — what helps?
Slowness usually means the hand is working too hard: check the grip first, then letter formation — a child who draws each letter in several strokes will always be slow. Practise letter families so each shape becomes one movement, and let speed grow on its own.
Are the worksheets free to print for my class?
Yes. The pack is free to download and print for your classroom, your school or your home, as many copies as you need. The only line I ask you to keep is the small credit at the bottom of each page.
Start tonight, with one page
Improving handwriting is not a course or a purchase. It is ten quiet minutes, the right letters grouped together, and a clean page to practise on. Print page 2 of the pack, and sit with your child or your class for the first row of tall letters.
If worksheets are part of your weekly workload, you may also like my guide to AI tools for teachers to create worksheets, and the free times table target circles worksheets that come with an online game my students ask for by name. And when I need a free typing tutor or PDF tool for the school computer, I look through FileCobra, where I keep the programs I actually use.
Written by Rehman Ahmad Chaudhary — Head Teacher, GPS 117 DB(BJ), Yazman, Pakistan. I build these resources for my own classroom first and share them free for teachers everywhere.
